Pièces détachées WHIRLPOOL AKZ96240IX, WHIRLPOOL AKZ96240NB


* Prix indicatif de vente, le prix exact sera affiché après que vous ayez saisi la référence de votre appareil.
Les pièces détachées pour WHIRLPOOL AKZ96240IX, WHIRLPOOL AKZ96240NB vous rendent service
Votre four demandait de réaliser une pyrolyse. Sauf qu'en la programmant, un message d'erreur F5 s'est allumé et le four est maintenant hors service. Un message STOP s'affiche et bloque l'utilisation du four, vous ne savez pas comment l'enlever. Pour savoir comment relancer votre four s'il affiche une erreur de type F5 alors que vous voulez lancer une pyrolyse, consultez le manuel de votre WHIRLPOOL AKZ96240NB. Vous saurez aussi comment faire disparaître un message STOP de l'affichage. La vitre intérieure, une pièce détachée d'électroménager pour four WHIRLPOOL importante, de votre four a explosé totalement pendant une pyrolyse. Votre four bipe quand vous essayez de le programmer. Seule la lumière intérieure s'allume. Vous avez fait deux pyrolyses mais l'intérieur du four est toujours très sale. La notice de votre WHIRLPOOL AKZ96240NB vous expliquera comment il est possible que la porte de votre four ait explosé. Il vous sera aussi précisé comment réussir à lancer votre four s'il bipe à chacune de vos actions ou encore comment faire si vos pyrolyses ne sont pas assez efficaces.


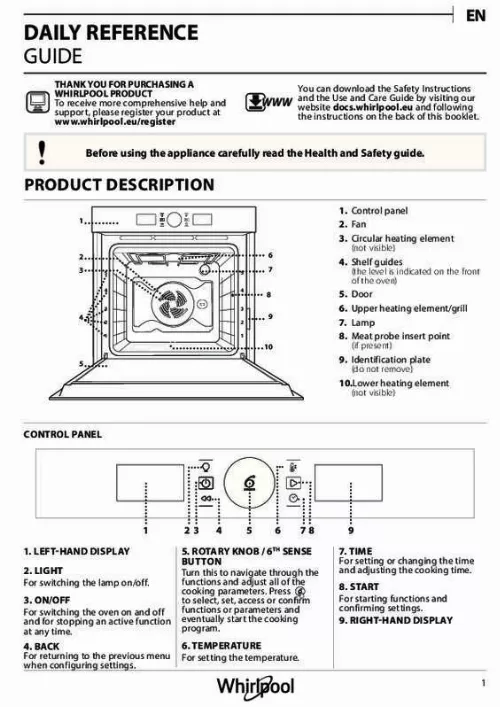
Extrait du mode d'emploi WHIRLPOOL AKZ96240IX
Les instructions détaillées pour l'utilisation figurent dans le Guide de l'utilisateur.
Once you have applied the settings you require, press to activate the function. You can press and hold at any time to pause the function that is currently active. ACTIVATE THE FUNCTION EN Please note: Once the function has started, you can change the temperature or the grill level by pressing or by turning the knob directly. PREHEATING Some functions have an oven preheating phase: Once the function has started, the display indicates that the preheating phase has been activated. DURATION When the icon flashes on the display, use the adjustment knob to set the cooking time you require to confirm. and then press You do not have to set the cooking time if you want to to confirm and manage cooking manually: Press start the function. In this case, you cannot set the end cooking time by programming a delayed start. Please note: You can adjust the cooking time that has been set during cooking by pressing : Turn the knob to change the hour and press to confirm. SETTING THE END COOKING TIME/ DELAYED START In many functions, once you have set a cooking time you can delay starting the function by programming its end time. Where you can change the end time, the display will show the time the function is expected to finish while icon flashes. the Once this phase has finished, an audible signal will sound and the display will indicate that the oven has reached the set temperature. At this point, open the door, place the food in the oven, close the door and start cooking by pressing. Please note: Placing the food in the oven before preheating has finished may have an adverse effect on the final cooking result. Opening the door during the preheating phase will pause it. The cooking time does not include a preheating phase. You can always change the temperature you want to reach using the knob. END OF COOKING An audible signal will sound and the display will indicate that cooking is complete. If necessary, turn the knob to set the time you want to confirm and start cooking to end, then press the function. Place the food in the oven and close the door: The function will start automatically after the period of time that has been calculated in order for cooking to finish at the time you have set. To extend the cooking time without changing the settings, turn the knob to set a new cooking time and. press. [...] 500 °C). Two selfcleaning cycles are available: A complete cycle (PYRO) and a shorter cycle (ECO). We recommend using the quicker cycle at regular intervals and the complete cycle only when the oven is heavily soiled. * Function used as reference for the energy efficiency declaration in accordance with Regulation (EU) No. 65/2014 3 USING THE APPLIANCE FOR THE FIRST TIME 1. SET THE TIME You will need to set the time when you switch on the oven for the first time. HEAT THE OVEN The two digits for the hour will start flashing: Turn the to confirm. knob to set the hour and press The two digits for the minutes will start flashing. Turn to confirm. the knob to set the minutes and press Please note: To change the time at a later point, press and hold for at least one second while the oven is off and repeat the steps above. You may need to set the time again following lengthy power outages. A new oven may release odours that have been left behind during manufacturing: this is completely normal. Before starting to cook food, we therefore recommend heating the oven with it empty in order to remove any possible odours. Remove any protective cardboard or transparent film from the oven and remove any accessories from inside it. Heat the oven to 200 °C for around one hour, ideally using a function with air circulation (e. “Forced Air” or “Convection Bake”). Follow the instructions for setting the function correctly. Please note: It is advisable to air the room after using the appliance for the first time. DAILY USE When the oven is off, only the time is shown on the to switch the oven on. display. Press and hold Turn the knob to view the main functions available on. the left-hand display. Select one and press 1. SELECT A FUNCTION Turn the knob to view the sub-functions available on to the right-hand display. Select one and press confirm. SET THE FUNCTION After having selected the function you require, you can change its settings. The display will show the settings that can be changed in sequence. TEMPERATURE/GRILL LEVEL To select a sub-function (where available), select the to confirm and go main function and then press to the function menu. When the °C/°F icon flashes on the display, turn the to confirm knob to change the value, then press and continue to alter the settings that follow (if possible). [...]..
Téléchargez votre notice ! Téléchargement gratuit et sans inscription de tous types de documents pour mieux utiliser votre four WHIRLPOOL AKZ96240IX : mode d'emploi, notice d'utilisation, manuel d'instruction. Cette notice a été ajoutée le Dimanche 2 Février 2018. Si vous n'êtes pas certain de votre références, vous pouvez retrouvez toutes les autres notices pour la catégorie Four Whirlpool.

Envoyer vos modes d'emploi - Foire aux questions - Dernières recherches - Derniers ajouts - Sitemap - Contactez-nous - Conditions générales - Politique de cookies
Copyright - Tous droits réservés.
Les noms de marques cités appartiennent à leurs propriétaires respectifs.


