Notice HAUPPAGE WINTV-GO/EXPRESS
Liens commerciaux


Extrait du mode d'emploi HAUPPAGE WINTV-GO/EXPRESS
Les instructions détaillées pour l'utilisation figurent dans le Guide de l'utilisateur.
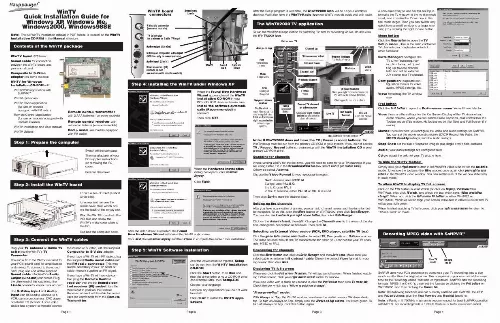
Click the Start button, then Run and then the driver letter of your CD-ROM drive (for example: D:\), then Setup. EXE Choose your language. Uncheck any applications you do not want to install. Click Install to install the WinTV applications. Page 2 Live TV mode Record mode SoftPVR uses your PC's processor to compress your TV recordings into a size much smaller than the original video. This compression process runs at the same time as the recording, called `real time compression'. SoftPVR has two recording formats: MPEG-1 or DivX. You can set the formats by clicking the Pref button on WinTV2000. and then clicking the Movies tab. Note: The following functions are not currently enabled with SoftPVR: the OTP and Pause buttons, plus the Fast Forward and Rewind functions. Note: a Pentium III 750MHz minimum is recommended for best SoftPVR operation with MPEG. For recording DivX, a 1. 5GHz Pentium or faster is recommended. Page 4 The S-Video input and Audio input can be used to connect to a VCR, camcorder, camera, DVD player or satellite TV receiver. If your video device has a yellow composite connec- Page 1 To start recording, either click the OTR (One Touch Record) button or the red Record button on WinTV2000. You can also start a recording by using WinTV Scheduler. To stop recording, click Stop. To close the recording controls, click the TV button. If you click OTR more than once, a record timer will be set and the record timer will be set 15 minutes for each time the OTR button is clicked. For example, if you click the OTR button 3 times, WinTV will record for 30 minutes. Recording settings Click the PREF button (Preferences menu), then the Movies tab to get to the Record settings menus. In DVCR Record Path, set the directory for your recordings. In Quality Level, you can set the format of your recordings. You can set MPEG or DivX record formats. Recording controls Record Button: Clicking the Record button will automatically generate a file name and start recording. Everytime you record a file, a new file is automatically created and the file name is displayed in the record window. The first file name will be _dvcr001. The second file will be _dvcr002. mpg and so on. While recording: Live video continues to play in the WinTV window. [...] Selecting an External Video source (VCR, DVD player, satellite TV box) Click the green Video source select button to select TV, Composite and S-Video sources. The video sources will use the TV standard chosen when you scanned for your TV channels (NTSC or PAL). Rescanning for channels Click the Menu button and click on Suite Manager and then Auto scan. Make sure you select cable or antenna in Broadcast / cable. Chose the correct Video format for your region and then click Scan. Displaying TV full screen When you click the Full screen TV button, TV will appear full screen. When finished watching TV full screen, click your right mouse button in the TV window. If you see video with a black box around it, click the Pref button then click TV mode tab. Check the box which says "Allow resolution change". "Always-on-Top" mode: With Always on Top, the WinTV window can always be visible on your Windows desktop. To turn on Always-on-Top, simply click the Always-on-top button. It will turn green. To turn off Always on Top, click this button again. Page 3 When the Hardware Installation dialog box opens, click Continue Anyway. Click Finish. Step 2: Install the WinTV board Locate a free PCI slot (a short white slot). Unscrew and remove the metal cover plate which covers the back of the empty slot. Plug the WinTV board into the PCI slot, and screw the WinTV's metal cover plate to the PC. Replace the computer cover. Recording MPEG video with SoftPVRTM Step 3: Connect the WinTV cables Plug your TV antenna or Cable TV cable into the WinTV's TV Connector. The audio from the WinTV is routed to your PC's sound card for amplification and mixing. To connect to the sound card, plug one end of the supplied Sound cable into WinTV's Audio output (LineOut) connector. Plug the other end of this cable into the LineIn connector on your sound card. tor instead of S-Video, use the supplied Composite to S-Video adapter. If you have a WinTV with FM radio, plug the supplied Radio aerial cable into the FM radio connector. This may not be necessary if your TV aerial or cable network supplies an FM signal. If you have a WinTV with remote control, plug the Remote Control receiver into the the Remote control receiver (IR) socket. Use the Velcro dot to position the Remote Receiver where it will be able to receive infra-red commands from the Remote Transmitter. [...]..
Téléchargez votre notice ! Téléchargement gratuit et sans inscription de tous types de documents pour mieux utiliser votre HAUPPAGE WINTV-GO/EXPRESS : mode d'emploi, notice d'utilisation, manuel d'instruction. Cette notice a été ajoutée le Samedi 3 Mars 2011.
