Mes Notices

600 000 notices et 900 000 pièces détachées électroménager

Notice EPSON ELPMB22 - INSTALLATION MANUAL (1.1)

Télécharger la notice

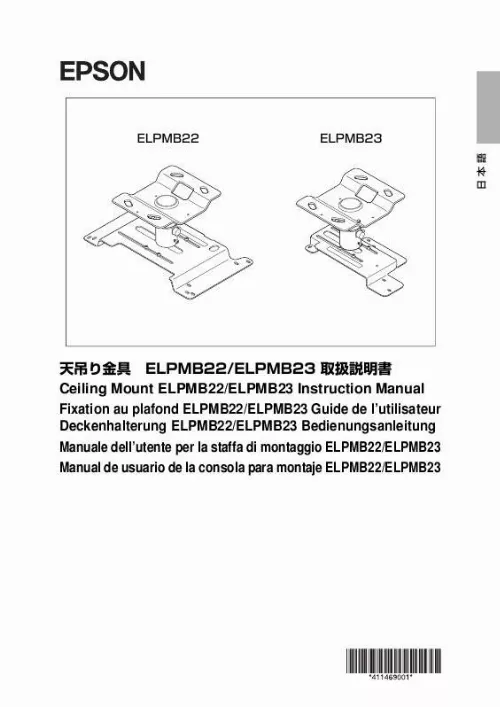
Extrait du mode d'emploi EPSON ELPMB22

Les instructions détaillées pour l'utilisation figurent dans le Guide de l'utilisateur.

(2) Adjust the lens position by moving the projector plate horizontally until the measurement on the scale sticker (measurement (A) in the illustration) equals the measurement for your projector shown on our website. (3) Fully tighten the four lens alignment screws using the hexagon wrench provided. Scale sticker (A) Horizontal movement Lens alignment screws (4 pcs. ) 2-6 Adjusting the Angle The ball joint structure makes it simple to fix the projector in any position within the installation angle range. Horizontal rotation adjustment range: 360 degrees in any direction Vertical tilt and sideways tilt adjustment range: ±18 degrees Warning Hold the projector carefully from below during adjustment. Retighten all screws after adjustment. If they are not sufficiently tight the projector may fall. 9 English Adjust by carrying out the following steps. (1) Remove the screw cap (protruding type) from the tilt adjusting screw. (2) Partly tighten the tilt adjusting screw using the offset wrench provided. (3) Adjust the projection position of the projector. (4) Fully tighten the tilt adjusting screw using the offset wrench provided. (5) Tighten the two tilt fixing screws using the hexagon wrench provided. (6) Fit the screw cap (protruding type) onto the tilt adjusting screw. (1)(6) Screw cap (2)(4) Tilt adjusting screw Horizontal rotation (5) Tilt fixing screws (2 pcs. ) Sideways tilt (3) Vertical tilt 3 Installing on a Concrete Ceiling (1) Fit a commercially available anchors and bolts to the concrete ceiling. (2) Fit the ceiling plate with a commercially available nuts. Concrete Ceiling plate Anchors Nuts Bolts · If there is a hanging ceiling or something else that interferes with installation on the ceiling, purchase and fit a separate extension pipe. For details, see "4 Extension Pipe" on page 11. Warning When installing the ceiling plate on the ceiling, install all parts so that they can fully withstand the combined weight and lateral movement of the projector body and ceiling mount. Use nuts and bolts that are M12 or higher. Failure to do so could cause the projector to fall. Epson accepts no responsibility for the projector falling due to inadequate installation. 10 4 Extension Pipe To adjust the height of where the projector is installed, you need to purchase a separate extension pipe. There are two extension pipe model numbers, ELPFP13 and ELPFP14. [...] For details, see "4 Extension Pipe" on page 11. 6 2-3 Fitting the Projector Plate to the Projector (1) Turn over the projector so that the operating panel faces downwards. (2) Use the four projector mounting screws provided to attach the projector plate to the projector. There are several oblong holes in the projector plate. Place the screws through the holes that align with your projector and tighten them. Projector mounting screws (4 pcs. )/lock washers (4 pcs. )/plain washers (4 pcs. ) Projector plate Projector lens side Projector operating panel side · The illustration may differ depending on the kind of projector. Warning Always use the screws provided to secure the projector. After tightening the screws check carefully that they are tight. Firmly fix the projector to the ceiling mount with a sufficiently strong safety wire or belt to prevent it from falling. (Read the instruction manual of the projector to confirm which part of the projector can be to attach a safety wire or belt. ) Applying a screw-locking adhesive or lubricant, oil and so on to the projector where it is fixed to the ceiling mount can make the case crack and the projector fall, leading to damage or injury. Do not use any sort of adhesive, lubricant, or oil when installing or adjusting the ceiling mount. 7 English 2-4 Fitting the Projector Plate to the Ceiling Plate (1) Insert the ball joint of the projector plate into the ceiling plate. Put the two protrusions on the ball joint into the grooves of the ceiling plate. Fit the plates together so that the ball joint is in the direction illustrated (Front view). (2) Tighten the two plate securing screws firmly with the hexagon wrench provided. Plate securing screw Plate securing screw Protrusions (2 pcs. ) Ball joint Projector lens side Front view Tilt adjusting screw/ screw cap (Left side) Tilt fixing screws (Right side/Rear side) 8 2-5 Aligning the Projector Lens Center Moving the projector plate horizontally enables you to align the center of the ceiling mount (the ball joint) and the center of the projector lens. Horizontal adjustment range: 130 mm (ELPMB22)/100 mm (ELPMB23) Warning Hold the projector carefully from below during adjustment. Retighten all screws after adjustment. If they are not sufficiently tight the projector may fall. [...]..

Téléchargez votre notice ! Téléchargement gratuit et sans inscription de tous types de documents pour mieux utiliser votre vidéoprojecteur EPSON ELPMB22 : mode d'emploi, notice d'utilisation, manuel d'instruction. Cette notice a été ajoutée le Vendredi 3 Mars 2010.

Vos avis sur le EPSON ELPMB22 - INSTALLATION MANUAL (1.1)

 Trop cher, trop cher. Super site, pas d'évis, je ne sais pas encore. Bon produit qui s'adapte parfaitement aux projecteurs prévus, je teste. Bien beamer, bonne qualité, fixation au plafond délicate.

Liens commerciaux