Pièces détachées BRANDT FV200XS1
* Prix indicatif de vente, le prix exact sera affiché après que vous ayez saisi la référence de votre appareil.


Extrait du mode d'emploi BRANDT FV200XS1
Les instructions détaillées pour l'utilisation figurent dans le Guide de l'utilisateur.
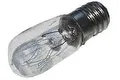
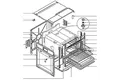
8 mm, 200 mm apart, and use the screws and plugs supplied) (fig. Check that the deflector is central, in relation to the vertical line on the wall. - Mount the evacuation duct (dia. 150 mm, not supplied) between the deflector and the hood. - Prepare your chimney, ensuring that the vents are towards the top and visible (fig. Push the chimney sections one into the other, as far as possible. - Mount the upper part of the chimney on the plastic deflector, using the screws supplied (to facilitate installation, pull the chimney slightly clear, so that the two returns can be inserted behind the plastic deflector). - Adjust the length of the chimney by sliding the outer part down and sitting it in the top of the hood. s 8 99628071_GB_A. qxd 21/01/03 13:46 Page 9 Connecting your hood Your hood is supplied with a power cable H05VVF, with three wires, section 0. 75mm² (neutral + phase and earth). Your hood should be connected to a 230 V single phase mains power supply, through a standard power socket CEI 83, which should remain accessible following the installation of the finishing panels, or through an omni-polar cutout, with a contact opening gap of at least 3 mm. If the power cable is damaged, contact an authorised Brandt service agent. Your installation should include a fuse, rating 10 A or 16 A. Using your hood Low speed: - for simmering and dishes that create little steam, - to create ventilation in the kitchen. Medium speed: - for normal cooking. Maximum speed: - for cooking creating considerable fumes or steam (frying, pressure cooker). Reset medium power immediately maximum power is no longer required. Changing a bulb Before carrying out any work, switch off the hood either by unplugging the power connector or by tripping the circuit breaker. BULB-LIT VERSION 1. Undo the screw of the shade. Swing it away. - For models with an E14 40watt bulb, unscrew the bulb and insert a new one. Replace the shade. Replace the screw. 9 99628071_GB_A. qxd 21/01/03 13:46 Page 10 Cleaning your hood The hood should be switched off before the metal filters are removed. After cleaning, the metal filters should be installed, as described in the instructions. ROUTINE MAINTENANCE Never use metal cleaning pads, abrasive products or excessively hard brushes. Do not clean the stainless steel using ammonia-based products. [...] 2 chimney mounting triangular notches fig. 3 Top of hood fig. 5 6 99628071_GB_A. qxd 21/01/03 13:46 Page 7 I n s t a l l i n g y o u r hood 3. Assembling the ventilation shaft for ducting outdoors: a) Operation with evacuation to outdoors The installation must comply with applicable regulations concerning room ventilation. In particular, evacuated air must not be transferred through a conduit used to evacuate fumes from equipment burning gas or similar fuels. Unused and existing conduits can only be used following approval by a qualified specialist. - Remove the two mounting screws from the plastic deflector (fig. The plastic deflector is only used for an installation in recirculating mode. - Push the non-return valves (fig. 2) into the hood outlet pipe. Remove the adhesive tape retaining the valves. - Recover the chimney support plate (fig. - Mount the metal chimney support on the wall, in contact with the ceiling (fig. Check that the two triangular notches are aligned with the vertical line on the wall (drill dia. 8 mm, two screws and plugs supplied). - Engage and secure the evacuation duct, dia. 150 mm (not supplied) in the hood outlet pipe. - In the case of a duct, dia. 125 mm, use the adapter supplied (fig. - Prepare your telescopic chimney, carefully covering the vents (fig. Push the chimney sections, one into the other, as far as possible. - Mount the upper part of the inner chimney on the metal support, using the screws supplied (to facilitate installation, pull the chimney slightly clear, so that the two returns can be inserted behind the metal support). - Adjust the length of the chimney by sliding the outer part down and sitting it in the top of the hood. Installation recommendations: For optimum use of your hood, we recommend that it be connected to a duct of diameter 150 mm. Keep the number of angles and the duct length to a minimum. If your extractor hood is being used to dispel air outside, make sure your kitchen has a fresh-air vent so that it does not become deprived of oxygen. 7 99628071_GB_A. qxd 21/01/03 13:46 Page 8 Installation of your hood fig. 7 chimney mounting fig. 6 Check whether notches are required to get the power cable through Top of hood 4. Assembling the ventilation shaft for recirculating the air In this case, non-return valves are not required. - Remove the two mounting screws from the plastic deflector (fig. [...]..
Téléchargez votre notice ! Téléchargement gratuit et sans inscription de tous types de documents pour mieux utiliser votre four BRANDT FV200XS1 : mode d'emploi, notice d'utilisation, manuel d'instruction. Cette notice a été ajoutée le Jeudi 8 mai 2008. Si vous n'êtes pas certain de votre références, vous pouvez retrouvez toutes les autres notices pour la catégorie Four Brandt.
Vous pouvez télécharger les notices suivantes connexes à ce produit :


Envoyer vos modes d'emploi - Foire aux questions - Dernières recherches - Derniers ajouts - Sitemap - Contactez-nous - Conditions générales - Politique de cookies
Copyright - Tous droits réservés.
Les noms de marques cités appartiennent à leurs propriétaires respectifs.