Mes Notices

600 000 notices et 900 000 pièces détachées électroménager

Notice BLACK & DECKER KA199

Télécharger la notice

Extrait du mode d'emploi BLACK & DECKER KA199

Les instructions détaillées pour l'utilisation figurent dans le Guide de l'utilisateur.

u Impairment of hearing. u Health hazards caused by breathing dust developed when using your tool (example:- working with wood, especially oak, beech and MDF. ) Vibration The declared vibration emission values stated in the technical data and the declaration of conformity have been measured in accordance with a standard test method provided by EN 60745 and may be used for comparing one tool with another. The declared vibration emission value may also be used in a preliminary assessment of exposure. 4 (Original instructions) Warning! The vibration emission value during actual use of the power tool can differ from the declared value depending on the ways in which the tool is used. The vibration level may increase above the level stated. When assessing vibration exposure to determine safety measures required by 2002/44/EC to protect persons regularly using power tools in employment, an estimation of vibration exposure should consider, the actual conditions of use and the way the tool is used, including taking account of all parts of the operating cycle such as the times when the tool is switched off and when it is running idle in addition to the trigger time. ENGLISH Assembly Warning! Before assembly, make sure that the tool is switched off and unplugged. Attaching hook and loop sanding discs (fig. A) Labels on tool The following pictograms are shown on the tool along with the date code: : # Warning! To reduce the risk of injury, the user must read the instruction manual. Warning! lock the sander off during sanding disc installation. Refer to “Lock Off” section. Your sander is designed to use 127mm sanding discs with the 8 hole dust extraction pattern. For best results, use BLACK+DECKER accessories. u Your sander is designed for use with either mesh carbide sandpaper or with standard sand paper with the 8 hole dust extraction pattern u To attach the sanding disc (6), carefully center it over the sanding pad (3) ensuring the holes in the disc align with the holes in the pad and press the disc firmly in place. u The hook and loop fastening system sanding disc can be easily removed by simply pulling it off. It can be reused as desired. Electrical safety This tool is double insulated; therefore no earth wire is required. Always check that the power supply corresponds to the voltage on the rating plate. Use Warning! Let the tool work at its own pace. Do not overload. [...] The use of any accessory or attachment or performance of any operation with this tool other than those recommended in this instruction manual may present a risk of personal injury and/or damage to property. This tool is not intended for use by persons (including Safety of others u This appliance is not intended for use by persons (including children) with reduced physical, sensory or mental capabilities, or lack of experience and knowledge, unless they have been given supervision or instruction concerning use of the appliance by a person responsible for their safety. u Children should be supervised to ensure that they do not play with the appliance. Additional power tool safety warnings Hold power tool by insulated gripping surfaces when performing an operation where the cutting accessory may contact hidden wiring. Cutting accessory contacting a "live" wire may make exposed metal parts of the power tool "live" and could give the operator an electric shock u Use clamps or another practical way to secure and support the workpiece to a stable platform. Holding the work by hand or against your body leaves it unstable and may lead to loss of control. u @ Warning! Additional safety warnings for sanders Residual risks. @ Warning! Contact with or inhalation of dusts arising from sanding applications may endanger the health of the operator and possible bystanders. Wear a dust mask specifically designed for protection against dust and fumes and ensure that persons within or entering the work area are also protected. u u Thoroughly remove all dust after sanding. Take special care when sanding paint which is possibly lead based or when sanding some woods and metal which may produce toxic dust: u Do not let children or pregnant women enter the work area. u Do not eat, drink or smoke in the work area. u Dispose of dust particles and any other debris safely. Additional residual risks may arise when using the tool which may not be included in the enclosed safety warnings. These risks can arise from misuse, prolonged use etc. Even with the application of the relevant safety regulations and the implementation of safety devices, certain residual risks can not be avoided. These include: u Injuries caused by touching any rotating/moving parts. u Injuries caused when changing any parts, blades or accessories. u Injuries caused by prolonged use of a tool. [...]..

Téléchargez votre notice ! Téléchargement gratuit et sans inscription de tous types de documents pour mieux utiliser votre ponceuse BLACK & DECKER KA199 : mode d'emploi, notice d'utilisation, manuel d'instruction. Cette notice a été ajoutée le Mercredi 3 Mars 2019.

Le mode d'emploi BLACK & DECKER KA199 vous rend service

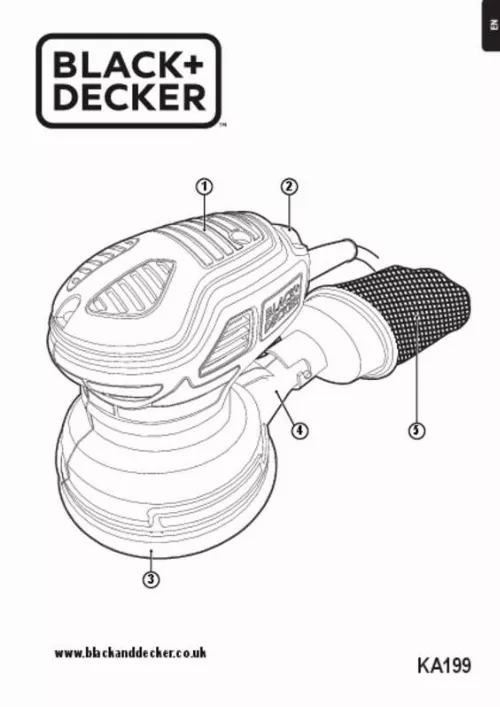
Vous venez de recevoir votre ponceuse mais vous vous êtes rendu compte que vous ne pouviez pas sortir la semelle triangulaire de votre matériel et cela même si vous appuyez sur le bouton de dégagement de l'élément. Le guide de votre BLACK & DECKER KA199 détaille la procédure à suivre pour remplacer la semelle de réception du papier de ponçage de votre appareil électroportatif. Le disque de votre ponceuse s'est détaché sans prévenir, lorsque vous étiez en train de l’utiliser. De plus, la pièce en plastique noir qui permettait à votre disque de se maintenir en place sur la semelle est depuis introuvable. Vous souhaitez savoir si cet élément est remplaçable. Vous devez changer la bande de ponçage de votre matériel, vous avez pour cela bougé le levier de serrage mais vous ne parvenez pas à modifier sa position. Vous apprendrez à ajuster la position du plateau de votre ponceuse pour changer de bande abrasive en vous référant à la notice de votre BLACK & DECKER KA199.

Liens commerciaux